Monday, March 29, 2010

Miniature planes

Here I'm going to show you two small planes that I made recently. I used Geza Burghardt's design, with his permission and guidance.

The first step was to cut some square brass bar stock. It is about 1cm thick and 2cm tall. I cut it into 5cm segments and then into the shape in the picture. The piece on the left is the 45 degree angle needed for the blade to rest on.
Here are most of the ingredients needed for a single plane. Two rosewood sides, a blade (which I purchased from Dick Tools) and some brass. The only thing missing is the brass rod used to hold the blade in place with a wedge, and also as reinforcement.

I was delighted to discover when working with rosewood for the first time that it smells like roses when cut.
I used epoxy to glue the wood to the brass, scratching both surfaces first to ensure a good bond. I scalloped out the smaller piece of brass to help clear the chips and shavings during use.

In the photo I am outside my house because epoxy is smelly stuff, and goes straight to your head without ventilation.

Once both pieces of brass were glued to a single side, I drilled a hole for the main brass pin. I then glued the other side on, and used the drill press to make a matching hole. The brass rod was super/krazy glued into place.

After that the basic shape was given to the plane using a file. Brass is quite soft and is pretty easy to work with using a file.

In this photograph is a calipers to show scale. The full length of the plane is less than 5cm.

After that I glued in five reinforcement rods using super/krazy glue. And then did some shaping on the sides. The first ebony wedge I made was too thin so I eventually replaced it.

Here are the two final planes completed. They have new wedges which are a bit thicker and easier to hit with a mallet. The brass and the wood have both been polished up to a high gloss on a buffing wheel.

The plane on the left has a curved bottom and is used (as shown previously) in the construction of the heel. It can also be used to scallop the braces of a steel string guitar. The other plane is identical except that it has a flat bottom.

I hope to use these finger planes for lots of different tasks.

Monday, March 22, 2010

The heel part one

This post will document the construction of the heel. The heel joins the neck to the body of the guitar, and in a classical guitar holds the sides in place. In this photo I am gluing a block of mahogany to the neck. This join needed to be very precise as the glue line will be very visible once the  heel has been carved.
Here is the neck held captive by a jig I used to cut the slots for the sides. The jig is of Geza Burghardt's design and it was one of the first things I made when I embarked on this project. As a novice woodworker it was quite tricky to construct. I think it would probably go a bit smoother if I was to try again now. The heel sticks out the back of the jig, as can be seen in the next picture. The bottom of the jig is not flat, but angled at the correct angle that the slots need to be cut at to ensure they meet the neck in a nice arc.

Here I am demonstrating how the slots are cut. The saw is made from a piece of maple and a japanese dozuki saw blade. In this photo the jig has been fitted with an extension plate in order to cut the second side of the slots (which will be hidden inside the guitar).
Using one of my trusty English chisels I cleaned out the slots. The heel has also been cut roughly on a bandsaw, with a curve on the outside, and an 'L' shape on the inside. The 'L' is tapered to the slope of the back of the guitar, and will be eventually glued to the back.
The curve of the heel was cut flat by chisel and then shaped to the correct profile using a finger plane. The bottom of this plane is curved to allow concave cuts to be made in the wood. The plane in the photo is one of Geza's, but I've since made two of my own, which I hope to show in the next post.

Sunday, March 14, 2010

The headstock part 2

This post with show the final few steps I took to finish the headstock of the guitar. First the ramps at the bottom of the slots were cut with a small handsaw and a chisel. In the photo you can see a small sanding stick that I used to do the final finish along with a metal file.
To finish the top of the slots, which are semi-circular I had to improvise a little. I made a small sanding drum from some steel rod and adhesive sandpaper in my drill press. In the photo you can see the dust layers left on the paper with the ebony on top and the mahogany on the bottom.

Here is the back of the headstock in its final state.
And the front. The ebony is very dense and hard so it can be worked to a very smooth finish with just sandpaper. You can also see the finished outline of the top here, which was completed with files and sanding sticks.


Here is the completed headstock with the tuners in place. That's it for the top of the neck, next will be the heel at the other end.

Wednesday, January 27, 2010

The headstock


The headstock will be a classic Hermann Hauser shape.

The outline shape was first scribed onto the ebony from a template. I then cut out the rough shape on the bandsaw, making sure to cut out the nails used as positioning pins during gluing.

Then I planed the sides down to the marked template outline, giving the headstock its final taper.


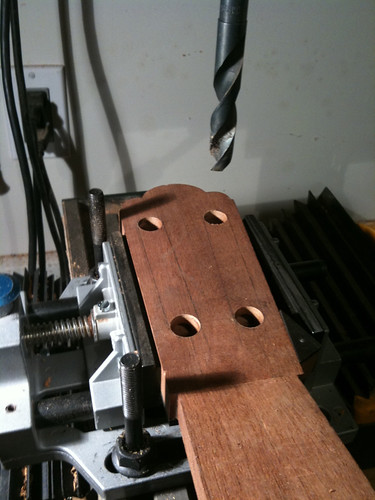
 I made a simple drilling jig out of acrylic (glued with super/crazy glue) to ensure accurate spacing and positioning for the tuner holes. I drilled the holes on my drill press after clamping the jig to the back of the headstock and holding the entire setup on its side in a vise.


The tuners I am using are Gotoh Hauser style tuners which I got from stewmac.com. A similar style is available from LMI, but they had black plastic buttons instead of real ebony for the same price.

After enlarging the holes slightly (10mm rollers will not fit in 10mm holes) to ensure a comfortable fit I pushed the tuners into place to see how things looked.

At this point I had already marked the position of the slots on the front and back of the headstock using dividers/compass, square and straightedge.

The top and bottom of the two slots were drilled out with a 14mm drill bit. The slot is 16mm wide, leaving 1mm clearance/room for error.

To ensure accurate drilling, I positioned the drill press and pre-drilled starter holes using a centre-drill. This helps stop the large bit from wandering when starting the hole.

I put tape on the ebony side, which was face down during drilling, to help prevent chipping and tearout. Ebony is quite brittle so this could have been quite messy. The tape and some sacrifice plywood underneath seemed to do the trick.


Once the four holes were drilled, I used a framesaw (which can be disassembled and reassembled inside a trapped hole) to connect them and roughly form the slots. It was quite difficult to cut a nice straight line like this, I think I need more practice.

Here you can see the first slot roughly completed. You can also see that the top of the headstock has been finished to its final shape. This shaping was done entirely with a file and small thing sanding sticks/wedges.


Here is the progress so far. The slots still need to be fine finished, and the bottom carved into a ramp. I'll show the finished headstock in the next post.

Wednesday, January 20, 2010

The V joint part 2


In the previous post I detailed the construction of the the female portion of the V joint. This post will show the male part, the final gluing & clamping and the final result.


In this photo I am planing down the 14 degree angle on the end of the long neck piece. The marked line that I am planing to is visible in the photo, and there is another line on the other side. At this point I switched from my larger block plane to the smaller low angle plane, as I concentrated on making the surface flat rather than removing wood quickly.
When I reached the marked line I checked that the angle was correct, and that the surface was flat.


The male part of the V Joint roughly cut (1-2mm spare) on the bandsaw. You can also see the replacement insert I made for the table which fits better than the original plastic one.


The underside of the V was first cleaned up to be parallel to the top side.


This piece is then cleaned up in the same manner as the female part, chiseling across the grain to form a ridge between the knife-marked Vs on each side. The ledges at the side of the V also need to be cut out square.


Here are both of the surfaces fine fitted together. The joint is close enough to hold the piece in place by friction.


You can also see that the neck has been marked and tapered down to near its final width.


This fit took several hours of fiddling with both pieces. It's better to take wood from the headstock piece as it is flat and smaller, so it can be salvaged, whereas the neck part has a limited amount of wood at the 14 degree angle to lose.


The pieces are now ready for gluing.

This is the two pieces clamped and gluing in Geza's workshop. I don't have clamps that long! The glue used is natural hide glue, which needs to be applied hot, and dries quickly. 


Although not visible in this photo the headstock is supported by a 14 degree wedge to hold it at the correct angle.


The joint was clamped for about 18 hours overnight.


The final result is a very strong and to my eye beautiful joint. Unlike a scarf joint, it is also very easy to taper the sides of the neck down to their final width right up to the nut before gluing.

After some cleanup the joint shows just how close a fit it is. I will admit that I made quite a few practice joints on scrap mahogany first, but still I was very pleased with this considering I had zero woodworking skills a year ago :)


In my next post I will be talking about making the headplate with ebony and some veneer.

Monday, January 18, 2010

Beginning the neck - The V joint part 1


The neck of my guitar will be made up of three pieces of honduras mahogany. The largest piece is the neck itself which is the long piece that can be seen in the foreground of this photo. The fingerboard will sit on this piece and it will contain a graphite support rod.


The second piece is the headstock, which holds the tuning heads and is joined to the neck with a 14 degree V-shaped joint. The final piece is the heelstock which is the large piece of wood in the background of this photo. It is sitting on top of the headstock piece.


In this photo my trusty straightedge (from Steward-MacDonald), a set of calipers, two palm planes and a Stanley Block plane.


The first step is to dimension the rough lumber to the required size. The top of the neck is leveled and one reference side (the treble side) is squared exactly. The other two sides are roughly planed and squared for easy marking.


The headstock is squared up and brought to exactly 18mm thickness. Both of the longer sides are squared, as is one of the end-grain sides. Planing end-grain is tricky but not impossible with mahogany. In the photo I am using a small low angle plane to shave small amounts of wood from the end-grain. Dampening the end-grain with warm water helps with this.


After this I marked the V shape on both sides of the flat headstock piece. It is important to measure precisely as even tiny differences between the sides can make constructing the joint impossible.


Once the V had been marked with a knife, notches were cut into the surface on the inside of the V. This makes cutting on the bandsaw easier as the edge is more visible. It also helps make a clean surface to construct the flat surface between both sides of the V.


I then cut the notch out on my 9" bandsaw. My bandsaw is one of only 4 power tools in my small workshop, along with a drill press, a hand drill and my beloved shopvac! The bandsaw isn't very big, but it is a huge time-saver and very useful.


I then created a new flat surface between the two sides, by taking tiny bites out of the ridge shown. Each chisel motion starts at the knifemark notch and continues to the centre of the surface where the ridge is formed. Eventually the ridge becomes less and less pronounced until it is flat.


The tight inside of the V is cleaned out periodically with a sharp knife.


In part 2 I'll show the other side of the joint, the gluing process and the final result.

Introductions


Veneer sandwich., originally uploaded by e stone.
This blog hopes to chronicle the construction of my first guitar. I am a student of Geza Burghardt in Vancouver, Canada. The final result (if everything goes to plan) will be a classical guitar inspired by the guitars of Hermann Hauser.

I have a tiny workshop, roughly 160cm (5') square, so some of the posts will talk about the challenges of woodwork in a confined space.